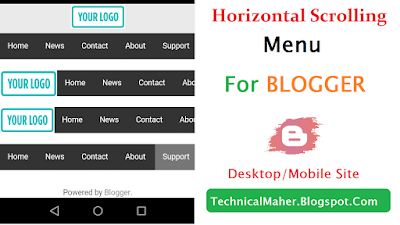
Step 1: Go to Blogger and open Layout.
Step 2: Add a gadget just above your "Blog Posts Gadget" as shown in below image and click on HTML/Javascript.
Note: If you are not able to add gadget above Blog Posts then simply add it in sidebar and drag it above Blog Posts because its important to keep it there
Step 3: Copy code of desired menu from below and paste it into HTML/Javascript window.
Simple Scrollable Nav Without Logo
<style>.nav-scroll { background-color: #333; overflow: auto; white-space: nowrap; position: relative;}.nav-scroll a { display: inline-block; color: white; text-align: center; padding: 14px; text-decoration: none;}.nav-scroll a:hover { background-color: #777;}</style><div class="nav-scroll"> <a href="https://www.blogger.com">Home</a> <a href="#news">News</a> <a href="#contact">Contact</a> <a href="#about">About</a> <a href="#support">Support</a> <a href="#blog">Blog</a> <a href="#tools">Tools</a> <a href="#base">Base</a> <a href="#custom">Custom</a> <a href="#more">More</a> <a href="#logo">Logo</a> <a href="#friends">Friends</a> <a href="#partners">Partners</a> <a href="#people">People</a> <a href="#work">Work</a></div>
Horizontal Scroll Nav With Scrollable Logo
<style>.nav-scroll { background-color: #333; overflow: auto; white-space: nowrap; position: relative;}.nav-scroll a { display: inline-block; color: white; text-align: center; padding: 14px; text-decoration: none;}.nav-scroll a:hover { background-color: #777;}.nav-scroll img { width: 100px; float: left; height: 48px; background: #fff;}</style><div class="nav-scroll"><img alt="logo" src="https://www.servicetrade.com/wp-content/uploads/2016/04/your-logo-here.png"/> <a href="https://www.blogger.com">Home</a> <a href="#news">News</a> <a href="#contact">Contact</a> <a href="#about">About</a> <a href="#support">Support</a> <a href="#blog">Blog</a> <a href="#tools">Tools</a> <a href="#base">Base</a> <a href="#custom">Custom</a> <a href="#more">More</a> <a href="#logo">Logo</a> <a href="#friends">Friends</a> <a href="#partners">Partners</a> <a href="#people">People</a> <a href="#work">Work</a></div>
Horizontal Scroll Nav With Fixed Logo On Left
<style>.nav-scroll { background-color: #333; overflow: auto; white-space: nowrap; position: relative;}.nav-scroll a { display: inline-block; color: white; text-align: center; padding: 14px; text-decoration: none;}.nav-scroll a:hover { background-color: #777;}.nav-scroll img { width: 100px; float: left; height: 48px; background: #fff;}</style><div class="nav-scroll"><img alt="logo" src="https://www.servicetrade.com/wp-content/uploads/2016/04/your-logo-here.png"/> <a href="https://www.blogger.com">Home</a> <a href="#news">News</a> <a href="#contact">Contact</a> <a href="#about">About</a> <a href="#support">Support</a> <a href="#blog">Blog</a> <a href="#tools">Tools</a> <a href="#base">Base</a> <a href="#custom">Custom</a> <a href="#more">More</a> <a href="#logo">Logo</a> <a href="#friends">Friends</a> <a href="#partners">Partners</a> <a href="#people">People</a> <a href="#work">Work</a></div>
Horizontal Scroll Nav With Fixed Logo On Top
<div class="nav-mob"><div id="slogo"><img alt="logo" src="https://www.servicetrade.com/wp-content/uploads/2016/04/your-logo-here.png" /></div><div class="nav-scroll"> <a href="https://www.blogger.com">Home</a> <a href="#news">News</a> <a href="#contact">Contact</a> <a href="#about">About</a> <a href="#support">Support</a> <a href="#blog">Blog</a> <a href="#tools">Tools</a> <a href="#base">Base</a> <a href="#custom">Custom</a> <a href="#more">More</a> <a href="#logo">Logo</a> <a href="#friends">Friends</a> <a href="#partners">Partners</a> <a href="#people">People</a> <a href="#work">Work</a></div></div><style>.nav-mob { position: relative;}#slogo img { float: none;width:100px}#slogo { position: static; width: 100%; text-align: center; padding: 2px 0px; background: #eaeaea}.nav-scroll { background-color: #333; overflow: auto; white-space: nowrap; position: relative}.nav-scroll a { display: inline-block; color: white; text-align: center; padding: 14px; text-decoration: none}.nav-scroll a:hover { background-color: #777}.nav-scroll img { width: 100px; float: left; height: 48px; background: #fff}</style>
Step 4: Save the gadget and note its ID or name it so that you can find it in your template to make it mobile view also.
Step 5: Go to Template and click on Edit HTML.
Step 6: Find your "Mobile Nav Gadget" in your template you just added in above steps with the help of its ID or name using Ctrl+F on your keyboard. You can directly jump to your gadget also.
Note: To make it mobile view only follow these steps.
Step 7: After finding the gadget copy below code and paste it after locked='false' as shown in below image:
mobile="only"
Step 8: Save your template and again go to Blogger > Theme > Mobile.
Step 9: Change Default template to Custom and click on Save.
Don't Miss:
Sharing is Caring! Share if you like :)


No comments:
Post a Comment